無料のAndroidアプリ開発環境AndroidStudioの解説と、簡単な画面サンプルを紹介します。
AndroidStudio(あんどろいどすたじお)
AndroidStudioとは
AndroidStudioとは、AndroidというOS上で動くアプリを開発するソフトです。
無料でAndroidアプリが作れるので、嬉しいですよね。勉強目的の人なんかは特に。
Androidアプリの開発といえば、開発環境はAndroidStudioだよねと言われるぐらいメジャーな存在です。
メジャーになる前は、EclipseやNetBeans等で開発している人が多かったようです。
プログラミング言語
プログラミング言語は、Java(じゃば)とKotlin(ことりん)の2種類があります。
Javaは当初から存在しますが、Kotlinのほうは誕生から日が浅く、最近になって標準実装(レギュラー入りを果たしました)されたようです。
Kotlinは、Javaを簡易化した言語になります。(JavaはC言語的、KotlinはVB的な文法のイメージ。)
慣れたらKotlinのほうが開発スピードは速そうです。ですが、情報量は未だJavaのほうが多いので乗り換えを渋っている人は多いのではないでしょうか。わたしもその一人だったりします^^;
画面レイアウト
画面の見た目を編集する機能は備わっておりますが・・・初めての人や、VisualStudioでWindowsフォームを開発したことがある人からみると、かなり使いづらいかもしれません。
画面レイアウトビューで編集というより、Textモードで編集して、Viewモードで見た目を確認する。といった使い方が多いかもしれません。
後半で実践解説がありますので体感してみてください。
Androidの各OSバージョンごとの開発も可能
このバージョンの範囲内で動かせるアプリを作りたい場合や、旧バージョン限定のアプリなんかも作れたりします。
OSのバージョンが上がって、最新バージョンを対応させるときが一番怖い^^;
旧バージョンのアプリでも互換性はある程度保たれていたりしますので、安定化させる目的で、わざと旧バージョンのままにしておくこともあったりします。
デバッグ環境
仮想スマホも用意されており、実機がなくてもデバッグ(細かい動作確認)が出来ます。
仮想スマホとは、スマホの形をした画面が起動されて、その中身はAndroidの中身そのものが動く感じです。その中に作成したアプリがインストールされて動きを確認できます。
もちろん、実機(スマホやタブレット)とUSBを接続して、デバッグすることも出来ます。
例えば、ボタンを押したときのタイミングでプログラムを一旦止めるなど。
プログラム1行ずつ進めながら確認でき、それぞれ変数の値参照などももちろん可能です。
配布用のツール作成も容易
Androidアプリのインストーラファイル(拡張子.apk)の作成も出来ます。
電子署名みたいなのを設定するだけで、後はapkビルドを実行するだけで作成できます。
例えば、Googleドライブなどからapkファイルをダウンロードしてインストールすることが可能になります。
インストールできなくてつまずくことがあると思いますが、不明アプリのインストール許可をすることはもちろん、一度アンインストールしないとインストールできないとか、あとはapkファイルのバージョンを上げないとインストールできないとか、いろいろありました。
なぜインストールできないのか、エラーメッセージのバリエーションを増やして欲しいところではありますね。
実際に動かして確認してみましょう。
以下、Windows10にAndroidStudioをインストールする手順になります。
ご参考ください。

いろいろなレイアウトで試す
インストールが出来たら、いろいろな画面レイアウトを試してみましょう。
LinearLayout(horizontal)サンプル
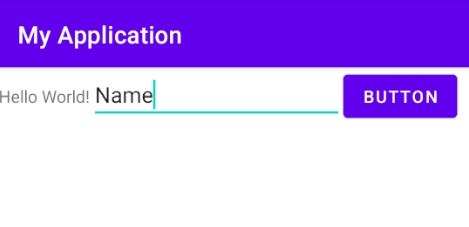
ボタンやテキストボックスなどを追加していくと、どんどん横に追加されていきます。
以下、Textモードで表示したときのサンプルコードになります。
<?xml version="1.0" encoding="utf-8"?>
<LinearLayout xmlns:android="http://schemas.android.com/apk/res/android"
    xmlns:app="http://schemas.android.com/apk/res-auto"
    xmlns:tools="http://schemas.android.com/tools"
    android:layout_width="match_parent"
    android:layout_height="match_parent"
    tools:context=".MainActivity">

    <TextView
        android:id="@+id/textView"
        android:layout_width="wrap_content"
        android:layout_height="wrap_content"
        android:text="Hello World!" />

    <EditText
        android:id="@+id/editText"
        android:layout_width="wrap_content"
        android:layout_height="wrap_content"
        android:ems="10"
        android:inputType="textPersonName"
        android:text="Name" />

    <Button
        android:id="@+id/button4"
        android:layout_width="wrap_content"
        android:layout_height="wrap_content"
        android:text="Button" />

</LinearLayout>
実行結果
テキストと、エディットと、ボタンが横に並んで表示される形になります。
LinearLayout(vertical)サンプル
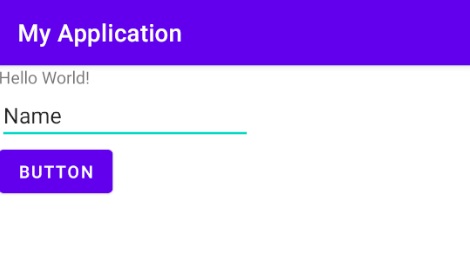
ボタンやテキストボックスなどを追加していくと、どんどん縦に追加されていきます。
さきほどのサンプルから、「追加」の部分だけ追加するだけになります。
<LinearLayout xmlns:android="http://schemas.android.com/apk/res/android"
    xmlns:app="http://schemas.android.com/apk/res-auto"
    xmlns:tools="http://schemas.android.com/tools"
    android:layout_width="match_parent"
    android:layout_height="match_parent"
★追加→    android:orientation="vertical"
    tools:context=".MainActivity">
実行結果
テキストと、エディットと、ボタンが縦に並んで表示される形になります。
LinearLayout(horizontal)と、(vertical)組み合わせサンプル
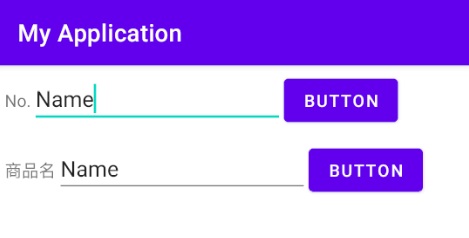
LinerLayoutの1階層目をverticalで、その下の階層をhorizontalで作ると、後述のTableLayoutみたいな形がつくれます。
<?xml version="1.0" encoding="utf-8"?>
<LinearLayout xmlns:android="http://schemas.android.com/apk/res/android"
    xmlns:app="http://schemas.android.com/apk/res-auto"
    xmlns:tools="http://schemas.android.com/tools"
    android:layout_width="match_parent"
    android:layout_height="match_parent"
    android:orientation="vertical"
    tools:context=".MainActivity">

    <LinearLayout
        android:layout_width="match_parent"
        android:layout_height="wrap_content"
        android:layout_margin="5dp"
        android:orientation="horizontal">
        <TextView
            android:id="@+id/textView1"
            android:layout_width="wrap_content"
            android:layout_height="wrap_content"
            android:text="No." />

        <EditText
            android:id="@+id/editText1"
            android:layout_width="wrap_content"
            android:layout_height="wrap_content"
            android:ems="10"
            android:inputType="textPersonName"
            android:text="Name" />

        <Button
            android:id="@+id/button1"
            android:layout_width="wrap_content"
            android:layout_height="wrap_content"
            android:text="Button" />
    </LinearLayout>

    <LinearLayout
        android:layout_width="match_parent"
        android:layout_height="wrap_content"
        android:layout_margin="5dp"
        android:orientation="horizontal">
        <TextView
            android:id="@+id/textView2"
            android:layout_width="wrap_content"
            android:layout_height="wrap_content"
            android:text="商品名" />

        <EditText
            android:id="@+id/editText2"
            android:layout_width="wrap_content"
            android:layout_height="wrap_content"
            android:ems="10"
            android:inputType="textPersonName"
            android:text="Name" />

        <Button
            android:id="@+id/button2"
            android:layout_width="wrap_content"
            android:layout_height="wrap_content"
            android:text="Button" />
    </LinearLayout>
</LinearLayout>
実行結果
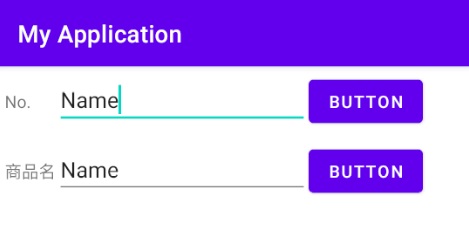
テキストと、エディットと、ボタンを横に並べた1つの形が、
縦に2つ並んだ形になります。
TableLayoutサンプル
表のような形のフォーマットが作れます。
テキスト部分の列を揃えたいなーといった場面で使えるかも。
表といえば、行と列の組み合わせで出来ておりますが、これと同じイメージで組む形になっております。
TableLayoutの下の階層に、TableRowという行を追加して、その下の階層に列の情報を追加する感じです。
<?xml version="1.0" encoding="utf-8"?>
<TableLayout xmlns:android="http://schemas.android.com/apk/res/android"
    xmlns:app="http://schemas.android.com/apk/res-auto"
    xmlns:tools="http://schemas.android.com/tools"
    android:layout_width="match_parent"
    android:layout_height="match_parent"
    android:orientation="vertical"
    tools:context=".MainActivity">

    <TableRow
        android:layout_width="match_parent"
        android:layout_height="wrap_content"
        android:layout_margin="5dp"
        android:orientation="horizontal">

        <TextView
            android:id="@+id/textView1"
            android:layout_width="wrap_content"
            android:layout_height="wrap_content"
            android:text="No." />

        <EditText
            android:id="@+id/editText1"
            android:layout_width="wrap_content"
            android:layout_height="wrap_content"
            android:ems="10"
            android:inputType="textPersonName"
            android:text="Name" />

        <Button
            android:id="@+id/button1"
            android:layout_width="wrap_content"
            android:layout_height="wrap_content"
            android:text="Button" />
    </TableRow>

    <TableRow
        android:layout_width="match_parent"
        android:layout_height="wrap_content"
        android:layout_margin="5dp"
        android:orientation="horizontal">

        <TextView
            android:id="@+id/textView2"
            android:layout_width="wrap_content"
            android:layout_height="wrap_content"
            android:text="商品名" />

        <EditText
            android:id="@+id/editText2"
            android:layout_width="wrap_content"
            android:layout_height="wrap_content"
            android:ems="10"
            android:inputType="textPersonName"
            android:text="Name" />

        <Button
            android:id="@+id/button2"
            android:layout_width="wrap_content"
            android:layout_height="wrap_content"
            android:text="Button" />
    </TableRow>
</TableLayout>
実行結果
以下のように、列が揃ったかたちになります。
その他レイアウト
他レイアウトもありますので、サンプルは無く申し訳ありませんが、解説したいと思います。
GridLayout
TableLayoutと同じように見えますが、セルの結合が行えます。
ConstraintLayout
最近になって登場したレイアウトになります。
ボタンとかを選択して、各辺の丸をドラッグすると、矢印がぐいーんと伸びます。
例えば左端まで矢印を伸ばすと、ボタンが左寄せになる感じ。4辺ともそれぞれの端まで伸ばすと、中央揃えになります。
(新規作成時の「HelloWorld!」がまさにその状態になってます)
画面端だけでなく、コントロール間にも矢印を伸ばせます。
例えばボタンの右側となりにテキストを配置したい場合、ボタンの右辺から矢印の伸ばして、テキストの左辺につなげることで、横にぴょこっと配置されます。
プロパティ画面内にあるLayout項目で、さらに細かい設定が行えます。間隔調整だったり、均列配置なども行えます。
レイアウト画面でマウスだけである程度の配置が楽に行えるので、かなり使いやすいレイアウトなのではないでしょうか。
CoordinatorLayout
新規プロジェクト作成 – ScrollingActivity
で作成されたのが参考になると思います。
スクロールに合わせて、ヘッダーなどのタイトル部分を見え隠れさせることができます。
Playストアも、このような動きになってますね。
見た目は結構恰好良くなると思います。
RelativeLayout
ボタンやテキストボックスなどをどこでも好きなところに配置できます。
VisualStudio開発者には馴染み深いレイアウトといいましょうか。
ConstraintLayoutのように、このコントロールから何dp横に配置する。といった設定も可能です。
最後に
いかがでしたでしょうか。
ひとまず画面レイアウトのみの紹介ではありましたが、もちろんそのほかにもネット通信やBluetooth通信、カメラ表示などスマホに搭載されているデバイスの制御も可能です。
今後、例えば自作アプリをプレゼンするようなことがあった場合は、「CoordinatorLayout」を使うと、いかにもアプリっぽいイメージになるのでお勧めだったりします。
さいごに、本とかを見て知識を蓄えることよりも、とにかくできるところから「少しずつ」変更したりしていろいろと試し続けることが一番の勉強になると思います。
最後まで見てくれてありがとう。
